Liam Kaufman

Software Developer and Entrepreneur

Stripe Would Be Perfect If…

I was among many Canadian developers who where happy to hear that Stripe had come to Canada. We were planning on adding subscriptions to Understoodit.com, so the timing couldn’t have been better. We assumed that it would take a couple of days to integrate Stripe, but it actually took @davidmisshula and me 7 days. The process gave me some insights that I thought I’d share.

I’ve heard that Stripe is significantly easier to integrate than its competitors, however, having never integrated a payment system I have no comparison. Overall I think Stripe is excellent and I’m glad we chose it, however, there are 4 areas, that if improved, would make Stripe perfect: 1) getting started, 2) taxes, 3) invoices and 4) edge cases.

Getting Started

Having never integrated a payment system into a website I wanted to be as careful as possible. I wanted to make sure that I understood as many details as possible, and had time to carefully map out all the things that needed to be done before pushing it to production. What I would have really liked was a diagram of how Stripe worked. A good diagram is much easier for me to parse, and would have helped me to understand the text documentation much quicker.

For instance, below is one possible diagram that would show the potential set of events associated with a new user signing up for a subscription plan.

A diagram of Stripe Payments

Taxes

Stripe response to does it deal with taxes

Understoodit is based in Canada, obligating us to collect taxes from Canadians, but not our international customers. The kicker is that different provinces have different tax rates. In total there are 4 different tax rates and then no taxes for international customers, for a total of 5 different tax levels. We currently have 3 monthly plans, and their 3 yearly equivalents. This means that we had to create (3 + 3) x 5 = 30 plans within Stripe.

It would have been significantly easier if Stripe had had a ‘tax’ feature, in the same way they have coupons. If such a feature existed we’d only have had to create 6 plans in Stripe and 4 tax levels. This would result in Stripe invoices including the subtotal, amount of taxes and total (one less thing for us to calculate). While Stripe does a great job of prorating payments, when a user switches from one plan to another, it becomes tricky for us when they switch province. While calculating taxes isn’t that difficult for us to do, it’s just one more thing we have to get right. It’s one more thing we have to calculate when sending an invoice to our customers.

Invoices

picture of a 37 signals invoice

Every online subscription that I currently have sends me a simple invoice at the end of each billing period. Some have .pdfs attached that I can easily send to an accountant. Additionally, those services include admin panels that list all the past invoices and those can easily be downloaded as pdfs.

It would be amazing if Stripe handled 1) emailing invoices and 2) creating a .pdfs of each invoice. Developers could provide simple HTML templates for email and pdf invoices and Stripe would fill in the blanks and send the invoice at the correct time, to the correct user. I suspect people would be willing to pay extra for this feature.

Edge Cases

Like any feature, there are multiple edge cases to a payment system. For instance here are a few that we dealt with:

  • Upgrade plan, and simultaneously change provinces (e.g. tax rate)
  • Downgrade plan and simultaneously change provinces (e.g tax rate)
  • Change credit card info, but not billing address
  • Change plan, but keep credit card and billing info the same

Stripe employees can no doubt enumerate many more edge cases than someone adding Stripe for the first time. It would be helpful if they provided a checklist of edge cases for developers. The checklist could also include common security concerns that developers should understand before rolling payments out.

Conclusions

With all the hype on Hacker News, I had this vision of Stripe being magically easy to integrate. While it wasn’t rocket science it was certainly more effort than I envisioned. The whole process was made significantly more difficult by having to handle taxes.

I wonder if there would be value in Stripe conducting the following usability experiment. Get a dozen computer science and engineering undergrads and ask them each to integrate Stripe into an existing website. Stripe employees would sit with them and monitor their progress (or lack of), but provide no help. I suspect that they’d find some surprises in how novices approach Stripe integration. The information gained in such an experiment could help them create better documentation, reduce development burden and ultimately create a more perfect Stripe.

Common JavaScript Errors

With the rise of thick client-side applications, and Node.js, JavaScript has become an increasingly important programming language. Despite its simplicity, JavaScript presents some difficulties for those new to the language. I thought it would be useful to outline several JavaScript errors that I commonly made when I was learning the language.

Scope: this, that and window

Like many programming languages JavaScript provides internal access to objects using the keyword this. Unfortunately, what this refers to differs depending on what called the function containing this. A common example, shown below, is what happens when setTimeout is called.

In the example below a Dog object is created, with a bark function. The Dog ralph is instantiated with the name ‘Ralph’ and when ralph.bark() is called, “Ralph” is printed to the console.

What becomes confusing is what happens when setTimeout is called with the parameters ralph.bark and 500. After 500 milliseconds ralph.bark is called, however, nothing is printed to the console.

The this problem
1
2
3
4
5
6
7
8
9
10
11
12
13
14
15
var Dog = function( name ){
  this.name = name;
}

Dog.prototype.bark = function(){
  console.log( this.name );
}

var ralph = new Dog('Ralph');

ralph.bark()
// Ralph is printed to the console

setTimeout( ralph.bark , 500 );
// nothing is printed to the console

Mozilla Developer Network refers to the problem above as ‘The ”this” problem’. What happens is this within bark() refers to the browser’s window variable when bark() is called from setTimeout.

Avoiding the this problem.

Solutions to the this problem.
1
2
3
4
5
6
7
8
9
10
11
// Works in JavaScript 1.8.5
setTimeout( ralph.bark.bind(ralph), 500 );

// using jQuery
setTimeout( $.proxy( ralph.bark, ralph ), 500 );

// using undescore.js
setTimeout( _.bind( ralph.bark, ralph ), 500 );

// using an anonymous function
setTimeout( function(){ ralph.bark(); }, 500 );

In each of the above the bind, or proxy functions explicity ensure that this within ralph.bark refers to ralph and not window. In the final example an anonymous function is called and provides another way of fixing the this problem.

Callbacks in Loops

When I launched Understoodit.com in May I included a waitlist for interested users to signup. I was planning on inviting a few dozen users a day, however, due to a deluge of emails sending out invites was delayed by a week or two.

To send the invites out, I went to Understoodit’s admin panel and seleted 40 people on the waiting list and clicked invite. A few days later I noticed that only a few individuals had accepted the invite. I looked at Postmark’s logs and noticed that invites were only sent to 5 individuals. What’s more those 5 individuals had received anywhere from 5 - 15 emails each. Meanwhile, the other 35 invitees had received no emails. The bug: I had a callback in a loop that iterated over all the selected invities and 1) called databaseModule.addInvitedUser, which created an invite token and added that invite to the database and 2) sent an email with the newly created token. Below is a simplification of the code, with error handling removed.

1
2
3
4
5
6
7
8
9
10
function sendInviteEmails( emails ){
  for(var i = 0; i < emails.length; i++ ){

    databaseModule.addInvitedUser( emails[i], function( error, token ){

      emailModule.sendInvite( emails[i], token );

    });
  }
}

What went wrong was that the anonymous function “captures the variable i, not its value”. The value of i is dependent on when the anonymous function is called, which varries depending on how long it takes to add the invited user to the database.

The solution I used was to wrap the anonymous function with an immediately invoked function expression (IIFE). The IIFE “locks” in the value of i ensuring that emailModule.sendInvite() refers to a different value of i on each IIFE call. Alternatively, one could create a second function outside of the loop and then call that (see option 2), a solution that would likely be easier to read.

1
2
3
4
5
6
7
8
9
10
11
12
13
14
15
16
17
18
19
20
21
22
23
24
25
// option 1
function sendInviteEmails( emails ){
  for(var i = 0; i < emails.length; i++ ){

    (function(email){
      databaseModule.addInvitedUser( email, function( error, token ){
        emailModule.sendInvite( email, token );
      });
    })( emails[i] );

  }
}

// option 2
function sendOneInviteEmail( email ){
  databaseModule.addInvitedUser( email, function( error, token ){
    emailModule.sendInvite( email, token );
  });
}

function sendManyInviteEmails( emails ){
  for(var i = 0; i < emails.length; i++ ){
    sendOneInviteEmail( emails[i] );
  }
}

The above quirk seems similar to a fairly common JavaScript interview question that takes the form of adding event listeners to an array of links.

Global Variables

The problems with global variables have been discussed many times before. Suffice it to say that you should avoid them by using var (e.g. var x = 0; vs x = 0;) when first declearing a variable. If you have a variable that has unaccounted for properties or values, there’s a chance that a global variable could be to blame.

I’d highly recommend defining all your variables at the top of the function to make it as clear as possible when a var is missing. Furthermore I’d recommend using JSHint which can warn you of global variables.

Values in HTML forms

A drop down menu
1
2
3
4
5
<select id="order-sizes">
  <option value="1">Small</option>
  <option value="2">Medium</option>
  <option value="3">Large</option>
</select>

When it comes time to get the form’s values, and use them within an application, I usually do something like:

1
2
3
4
5
var orderSize = $('#order-sizes option:selected').val();

if( orderSize === 1 ){
  console.log('Thanks for ordering a small!');
}

Unfortunately the value that jQuery returns is a String, and comparing it to 1, a Number returns false. Here are several solutions to this:

1
2
3
4
5
6
7
8
9
10
if( Number( orderSize ) === 1 ){ ... }

if( parseInt( orderSize ) === 1 ){ ... }

if( orderSize == 1 ){ ... }

// last solution
var orderSize = Number( $('#order-sizes option:selected').val() );

if( orderSize === 1 ){ ... }

In the first two examples orderSize is explicitly converted to a Number using the Number constructor and the global parseInt function. In the third example the double equals coerces orderSize to a Number before comparing to 1 (MDN on comparison operators). However, I’d recommend going with the last approach, which allows you to use orderSize as a Number in multiple spots without having to repeatedly caste to a number. If you don’t like the last approach I’d recommend the first or second approach, since it seems to be generally preferred to use the strict equal (tripple equal signs) and not to use the double equal sign.

Conclusions

Many of the above errors can be avoided by following JavaScript style guides (Google JavaScript Style Guide, Addy Osmani on Style Guides). A sign of how tricky JavaScript is comes from Github’s JavaScript Style guide that goes as far to recommend avoiding JavaScript altogether and using CoffeeScript - a suggestion a few would disagree with!

Redis and Relational Data

UPDATE: Based on the feedback in the comments (Phineas), I’ve added an index to the comments table and updated the results.

Using the right tool for the job is a basic tenant amongst programmers. However, with all the currently available database options it’s increasingly difficult to figure out what the right tool is. Sometime it’s nice to have a very simple tool that can be used for many different tasks: Redis. Over the last 4 months I’ve been using Redis heavily and I’ve even started to use it for relational data. I’ve been curious to find out the performance differences between Redis and PostgreSQL. Below I’ll provide an example of storing a simple relational dataset in Redis, and I’ll look at the performance differences between Redis and PostgreSQL.

Why use Redis for Relational data?

I find Redis appealing because it’s the simplest database that I have ever used (relative to: MySQL, PostgreSQL, Riak & Mongo). The documentation includes the time complexity of each command, and the documentation provides an interactive console to experiment with a given command. There’s also a certain appeal to using a single database instead of 2 or 3:

  1. It’s much quicker to master 1 database than 2.
  2. Two different databases means twice the updates, bugs and crashes.

I’ll outline a few ways Redis can be used to store relational data and the performance differences between redis and PostgreSQL. All the examples and performance tests were done using Node.js.

Storing Relational Data in Redis

Redis values can be 1 of 5 different datatypes: strings, hashes, lists, sets and sorted sets. Each row in a relational database can be represented using a hash, and a list, set or sorted set can be used to represent a table. The datatype that’s used to represent the table is dependent on how the data needs to be retrieved.

For example, let’s say we’re storing blog posts. In Redis, each post will be stored in its own hash, with its key corresponding to the post’s url:

A Post
1
2
'a-post-about-databases' :
  { title : 'A post about databases', body : '...', createdAt : 1338751532301}

Retrieving a single post using the url becomes O(N), where N is the size of the hash (post). Since the number of keys in a post is constant, retrieving that post becomes O(1). However, if we wanted to get all the posts, or a subset of them, it becomes useful to also store the keys in a sorted set (e.g. the “table”). Using a sorted set means that posts can be stored by their createdAt date and it allows us to retrieve all the posts, or a subset of them (useful for pagination).

Retrieving a subset of all posts
1
2
3
4
5
6
7
8
9
redis.zrange('posts', 0, 10, function(error, posts){
  //return the keys (urls) associated with the first 11 posts
})

var startDate = (new Date(2012, 5, 1)).getTime() ; // June 1st
var endDate = (new Date(2012, 5, 30)).getTime(); // June 30th
redis.zrangebyscore('posts', startDate, endDate, function(err, posts){
  //returns the keys (urls) associated with all the posts from June 2012
})

The above example is relatively straight forward, but what about storing the post’s comments? For every post we create a new sorted set called: ‘comments-KEYofPOST’. The comments are sorted by their creation time. To get a post, and its comments, we could do the following:

Storing a post’s comments
1
2
3
4
5
6
7
8
9
10
11
12
13
14
15
var postURL = 'a-post-about-databases'

var multi = redis.multi();

// queue up the queries
multi.hgetall(postURL);
multi.zrange('comments-' + postURL, 0, -1);

// execute the queries atomically
multi.exec( function(error, results){
  /*
  results[0] will contain the post
  results[1] will contain an array with all the comments
 */
});

Redis vs. PostgreSQL Performance

In SQL you might do 1 query to get the post and another to get the comments, or use a join to get the post and the comments in one query. With the approach above, using Redis, 2 queries are atomically executed, using the multi and exec commands. Both in PostgreSQL, and Redis, a single request is sent the database to retrieve 1 post and its 10 comments.

To test the the performance I created a dataset that includes 10,000 ‘blog posts’, with each post having 10 comments (100,000 comments in total). All tests were run on a 2011 Macbook Pro (2.3 GHz i7, 8GB RAM). To test PostgreSQL, I sequentially fetched each post and used a join to retrieve its comments (10,000 separate queries). The test was repeated six times to produce an average time and was done for both PostgreSQL and Redis.

Redis & PostgreSQL Performance

Average Time (Seconds) Query (Milliseconds)
psql 138.34 13.8
psql (Native Bindings - NB) 125.95 12.6
psql (NB + Index) 2.72 0.27
Redis (Hires) 0.76 0.067

Using PostgreSQL, it took an average of 138.34 seconds to execute all 10,000 queries, or 13.8 milliseconds/query. Using the native bindings, that come with the psql node module, yielded an improvement and was associated with 12.6 milliseconds/query. When an index was added to comments (post_id), the time dropped to 2.72 seconds, or 0.27 milliseconds for a post and its 10 comments. In contrast, Redis can retrieve a post and its comments in 0.067 milliseconds. Of course the above is akin to comparing apples to oranges, but it still provides a glimpse into the performance differences between Redis and PostgreSQL.

While Redis is in memory and should be fast, PostgreSQL uses caching algorithms (LRU) to keep its contents in memory. Of course, keeping everything in memory (Redis) will most likely be faster than using LRU.

Caveats to using Redis for Relational Data

The single biggest caveat to using Redis, is that it is entirely in memory. If your relational dataset is 2.5GB (not that large), you’ll need a $160/month Linode (4GB RAM) to keep it in Redis. In contrast, a $20/month Linode (512MB RAM) has 20GB of disk space and could easily hold that same dataset using PostgreSQL. This tradeoff becomes even more of an issue as your dataset become larger than 4GB.

The above example only represents a very simple relationship between two pieces of data (posts and comments), mapping a many-to-many relationship in Redis would take a little more imagination.

Conclusions

Before storing all your app’s data in Redis it’s advisable to estimate how large your dataset will be in a year, or two, and how much much RAM will be required to use Redis. If your dataset will be greater than 4GB in a year, and money is a constraint, it probably makes sense to put all, or a portion of the data, in PostgreSQL, or use an alternative noSQL solution (e.g. Riak or Mongo).

Code on Github

Adding Authentication, Waiting Lists and Sign Ups to an Express App Using Drawbridge.js and Redis

There are several popular modules for adding password-based user authentication to an Express.js app. Unfortunately, they require writing lots of code to get started. I prefer the approach that authentication libraries like Devise take: they generate code and views, and you’re free to modify, or delete, what’s created.

Given the authentication options for Express.js I wanted to create a module that would make adding user authentication quick and easy. Moreover, I also wanted developers to be free to edit and modify the generated views. In addition to authentication I wanted the module to handle sign ups (the type you see on a just-launched startup’s page) and to handle waiting lists and invitations. Based on the module’s functionality I’ve decided to call it Drawbridge.js.

User Authentication with Drawbridge.js

Drawbridge.js uses Redis to persists its data, but it’s possible for developers to create other database adapters for Drawbridge (pull-requests accepted). I chose Redis because its ability to pipeline multiple commands reducing round trips between the server and the database. The atomic nature of pipelined commands obviates a lot of complex callbacks and makes the resulting code much easier to understand. Overall Redis is easy to use, easy to understand and fast - great features for an authentication module.

To send email, Drawbridge uses either nodemailer, or the postmark modules. I included the Postmark option because I’m currently using it and I like it. However, developers are free to add additional email adapters.

Drawbridge Screencast

I’ve created a short screencast to show how easy it is to add drawbridge to an existing Express.js application. Before you watch the screencast it’s important that I outline a couple of caveats:

  1. Drawbridge is not ready for production - it’s basically a working prototype.
  2. Drawbridge views and variables are inconsistently named, that will need to be fixed.
  3. The code needs refactoring and more testing.
  4. Drawbridge needs to be picked apart for security issues.

With those caveats out of the way here is the video:

Drawbridge.js from Liam Kaufman on Vimeo.

While I built Drawbridge.js to scratch my own itch, I hope others will find it useful as well. Once I refine it further I will most certainly start to use it in my own projects. If you’re interested in Drawbridge 1) watch the project on Github and 2) try and get it working on your toy Express apps. I welcome feedback on both the architecture of Drawbridge and its security.

Drawbridge.js on Github

Making Hacker News Faster: Two Approaches

Over the years traffic to Hacker News (HN), “a social news website about computer hacking and startup companies” (Wikipedia), has grown consistently, with an average of 150,000 daily uniques. The growth in traffic may explain why load times seem increasingly variable. I couldn’t help but wonder if some optimizations could be made to decrease both variability and load times. I’ll propose two broad approaches, the first involves migrating away from table based layouts while the second involves consuming a JSON API.

Approach 1: Tables to Divs

Table 1. Hacker News Resource Statistics

Resource Size (With Tables) Size (With Divs) % Change
HTML 26KB 15KB -42%
CSS 1.7KB 2.3KB +35%
Logo 100B 0 -100%
Up Arrow 111B 0 -100%
Total 27.9KB 17.3KB -37.2%

In the DIV version, the logo and up arrow were base 64 encoded and included in the HTML and CSS files.

HN’s front page is comprised of: 4 tables, 98 rows, 159 columns, 37 inline style declarations and numerous attributes that dictate style. To reduce the markup on the front page I created a new HN front page (Github link) that looks identical to the existing page but does not include tables or inline css. I also went a step further and base64 encoded both the logo and the up arrow to decrease the number of requests. The completed CSS file was run through a css minifyer to yield further reductions. With those changes only two requests are necessary, one for the HTML file and one for the CSS file. Table 1 shows that those changes yielded an overall reduction of 37%.

I also slightly modified the JavaScript responsible for sending up-votes to the server. Instead of grabbing a vote’s id from the id of the HTML node, it gets it from the ‘data-id’ attribute. Otherwise, the JavaScript remains identical. As an aside, if you have not examined the JavaScript that is responsible for sending votes to the server, I’ve included it below (the existing code). It’s a creative use of an image tag. An image node is created, but not added to the DOM. When the image node is assigned a ‘src’, which happens to include all the vote info, it then requests the ‘image’, using the constructed url. Thus the ‘image’ request becomes analogous to an AJAX GET request, but without a conventional response.

Votes With IMG Nodes
1
2
3
4
5
6
7
8
9
10
11
12
13
14
15
16
17
18
function byId(id) {
  return document.getElementById(id);
}

function vote(node) {
  var v = node.id.split(/_/);   // {'up', '123'}
  var item = v[1];

  // hide arrows
  byId('up_'   + item).style.visibility = 'hidden';
  byId('down_' + item).style.visibility = 'hidden';

  // ping server
  var ping = new Image();
  ping.src = node.href;

  return false; // cancel browser nav
}

Approach 2: JSON API

Although approach 1 results in a 37% decrease in data transferred to the client, markup and data must be transferred to the client on every refresh. In approach two, the markup is only transferred to the client once, and then cached, while the data is sent the client via JSON. Using this approach would decrease the HTML file but no doubt increase the JavaScript file. However, both of those resources could be cached in browser, and cached on a CDN, drastically reducing the number of requests to HN’s server. Furthermore, the JSON representing the stories on the front page is 7.8KB, much smaller than the amount size of the existing solution or even approach 1.

Approach 2 is not without its drawbacks. It would require significant changes in both HN’s backend and large changes to the client-side. A JavaScript application and API would have to be created. This approach would likely be incompatible with bots that would not execute the JavaScript necessary to populate the page with stories. To get around this the agent-type could be detected and a static version could be served to bots. Alternatively, the webpage could be pre-populated with stories and subsequent requests would take advantage of AJAX get requests. This would simplify matters, but make caching more difficult, since the cache page would require updating every time the front page changes.

Conlusions

By transitioning from tables to divs, and inline css to external css, HN could dramatically reduce the bandwidth required to serve its web pages. The first approach would require minimal changes to HN’s back-end making it a good candidate for adoption. While the second approach could yield even better results, it would require drastic changes to both the server and the client, making it more suitable as a long term solution.

In addition to the two approaches above, gzip compressing both the .html and the .css would further reduce transferred data. It would also be beneficial to add the appropriate headers to enable browser caching for CSS.

While Paul Graham may have insufficient time, or interests, in implementing some of the above changes, I suspect he knows a few individuals who would be willing to help out.

Code on Github

From Digg to Reddit to Hacker News: What’s Next?

Dustin Curtis, the creator of Svbtle, recently mentioned on Twitter:

I miss the Hacker News from four years ago. It was awesome. The discussions there are not even worth reading anymore. It’s sad.

Based on the number of retweets and favorites, I suspect that others agree. In fact the idea that Hacker News is degrading is common enough that it has been addressed on HN’s guidelines:

If your account is less than a year old, please don’t submit comments saying that HN is turning into Reddit. (It’s a common semi-noob illusion.).

However, Mr Curtis has been on HN for over five years, and is certainly not subject to the ‘common semi-noob illusion’. Is HN getting worse then?

I suspect that when HN started only those that were most passionate about hacking were familiar with HN and would take the time to comment on it. As time went on the popularity of both Y Combinator and HN may have resulted in the level of discourse regressing to the mean. That’s not to say that there aren’t still intelligent comments, in fact I’d argue that there are more intelligent comments than there were 4 or 5 years ago. However, people tend to remember the unintelligent comments more, especially when those comments contain opinions that differ from their own or originate from non-experts.

If Digg, Reddit and Hacker News are no longer the best places for discussion how can we create a place that is? While there ought to be many ways to encourage scholarly discussion, and discourage idiotic comments, I want to explore several ideas.

Exclusivity

In the early stages Digg, Reddit and Hacker News were implicitly exclusive. They didn’t discourage people from joining, but their initial lack of popularity acted as a filter to those who were technically savvy and within certain social networks. Once the exclusivity vanished the communities became diluted. Forrst is explicitly exclusive and is by invitation only. Does Forrst’s exclusivity lead to a stronger community? To reiterate, is exclusivity a necessity in keeping a social news site strong and viable?

Experts

I enjoy when an article pops up on HN about physics or biology and several graduate students in those fields provide intelligent comments. Is there a way to officially denote that someone is an expert in a field and automatically give their comments more weight? In very esoteric subjects it isn’t necessary, the complexity of the subject reduces “average” comments. However, in simpler subjects, bikeshedding becomes an issue. Could bikeshedding be prevented by weighting comments based on the user’s past comments? For instance, if an individual has been voted up when discussing physics, perhaps future comments on physics should be algorithmically voted up.

Focus

One thing I really appreciate about HN is the variety of content. However, I can’t help but wonder if a social news site restricted the content to just a specific topic if that would both decrease the probability that the content, and discussion, become watered down? Forrst focuses on design and development, has their focus helped them? Reddit has addressed this issue with subreddits, but the result seems to be many hardly used subreddits. I think focus is important, but at the same time I like being exposed to new topics, can the those two wishes be balanced?

Conclusions

There is no magic bullet for maintaining the quality of a social news site, but there are a collection of concepts that may help. It would be interesting to A/B test some of those ideas. One could imagine creating several social news websites for different topics and making some exclusive and some not, or altering other variables and see which succeed. What do you think is important in a social news site?

Scraping Web Pages With jQuery, Node.js and Jsdom

I always found it odd that accessing DOM elements with Ruby, or Python, wasn’t as easy as it was with jQuery. Many HTML parsing libraries employ Simple API for XML (SAX) that can handle extremely large XML documents, but is cumbersome and adds complexity. Other parsing libraries use XML Path Language (XPath), which is conceptually simpler than SAX, but still more of an effort than jQuery. I was pleasantly surprised to discover that it’s possible to use jQuery to parse web pages with Node.js. This is accomplished by using jsdom, “a javascript implementation of the W3C DOM”.

jQuery and jsdom

Using jsdom you can specify a local file, or url, and jsdom will return the window object for that document. Additionally, JavaScript can be inserted into the document; in our case we’re inserting the jQuery library. In the example below all the links from the Hacker News front page are logged to the console.

Scraping Links From Hacker News
1
2
3
4
5
6
7
8
9
10
11
12
13
14
15
16
var jsdom  = require('jsdom');
var fs     = require('fs');
var jquery = fs.readFileSync("./jquery-1.7.1.min.js").toString();

jsdom.env({
  html: 'http://news.ycombinator.com/',
  src: [
    jquery
  ],
  done: function(errors, window) {
    var $ = window.$;
    $('a').each(function(){
      console.log( $(this).attr('href') );
    });
  }
});

Making Scraping More Robust

Unfortunately there are few common bugs that I ran into when scraping content with jQuery and jsdom. Specifically there are two issues, that aren’t necessarily specific to jsdom, that are worth watching out for.

jQuery Return Values

The first issue are return values from jQuery function calls. Extra attention has to be paid to return values. Applying a method to undefined will crash a program, a problem that can be especially apparent in DOM parsing. Consider the example below:

1
$($('a')[7]).attr('href').split('/')

If there are 8, or more, links on a page the 8th link will be returned and its href attribute will be split into an array. However, if there are less than 8 the attr('href') will return undefined and calling split() on it will crash the program. Since HTML pages aren’t as structured as API responses, its important not to assume too much and always check return values.

Web Page Errors

It’s entirely possible that the url passed to jsdom returns an error. If the error is temporary, your scraper might miss out on important information. This issue can be mitigated by recursively retrying the url, like the example below:

Managing Errors
1
2
3
4
5
6
7
8
9
10
11
12
13
14
15
16
17
18
19
20
21
22
23
24
25
26
var getLinks = function(retries){

  if(retries === 3){
    return;
  }else if (retries === undefined){
    retries = 0;
  }

  jsdom.env({
    html: 'http://news.ycombinator.com/',
    src: [
      jquery
    ],
    done: function(errors, window) {

      if(errors){
        return getLinks(retries + 1);
      }

      var $ = window.$;
      $('a').each(function(){
        console.log( $(this).attr('href') );
      });
    }
  });
}

With the above approach, if errors are encountered getLinks will be called recursively with a larger retries value. On the 3rd retry the function will return. If you wanted to go further you could wrap the recursive call in setTimeout to ensure that the recursive web request was not made immediately after the error was encountered.

Conclusions

Parsing web pages with jQuery on the server is a much more natural experience for developers already accustomed to using jQuery in the client. However, prior to scraping it’s worth checking if the site 1) allows scraping and 2) does not already have an API. Consuming a JSON API would be even easy than scraping and parsing!

Why Riak and Node.js Make a Great Pair

In the last few years there has been a proliferation of noSQL databases. Searching on Google for site:news.ycombinator.com nosql yields over 2,500 hits, many of which include include posts asking when you’d want to use a noSQL database. If you’re used to a relational database it might seem like an unnecessary burden to learn another database paradigm, but there’s one open source noSQL database that I think is not only worth the burden, but is a perfect fit for Node.js development: Riak (pronounced “REE-ack”).

Why is Riak a Good Fit with JavaScript and Node.js?

Riak-js makes storing JavaScript objects easy. There is no need to JSON.stringify() a JavaScript object when saving it, or applying JSON.parse() when retrieving.

Riak and Node.js Basics
1
2
3
4
5
6
7
8
9
10
11
12
13
14
15
16
var db = require('riak-js').getClient();
var post = {id: 17,
            date: new Date(),
            title: 'a blog post',
            body: 'A blog post about Riak'};

db.save('posts', post.id, post);
db.get('posts', 17, function(err, data, meta){
    console.log(data);
});
/* prints
{ id: 17,
  date: '2012-02-29T18:26:44.400Z',
  title: 'a blog post',
  body: 'A blog post about Riak' }
*/

In the above example, a riak-js client is created and a post object is created. The post object is saved into the ‘posts’ bucket, with its id as its key. To retrieve the post, the bucket and key are referenced.

Using JavaScript in the client, and the server are nice, and being able to easily save JavaScript objects is even better. Not having to switch between languages would certainly reduce annoying syntactic problems. This would also allow you to write the entire stack in JavaScript, CoffeeScript or ClojureScript, giving you several programming paradigms to choose from.

If you decided to use Backbone.js on the server, calling toJSON() on a Backbone model would allow you to easily store the model in the Riak.

Why Riak?

At this point you might be wondering why you’d want to use Riak when CouchDB also has a JavaScript interface and can do some of the above. As Damien Katz, the creator of CouchDB has pointed out, CouchDB is slow and can’t “scale-out on it’s own”. In contrast, Riak was built for replication and scaling out. In fact, people at Basho, the company behind Riak, indicate that adding new nodes actually increases throughput.

Additional Features of Riak

Saving JavaScript objects and easy scaling are both good fits with node.js but Riak has some additional features, such as buckets and links, that make retrieval convenient. With buckets the following functions become possible:

Riak Buckets
1
2
3
4
5
6
7
8
// Get all the posts within the posts bucket
db.getAll('posts');

// Get all the posts with the title ===  'a blog post' 
db.getAlll('posts', { where: {title: 'a blog post' }});

// Get the number of posts
db.count('posts');

Another interesting property of Riak, is it’s concepts of links. A link establishes a “one-way relationships between objects in Riak”. For instance, say we wanted to link similar posts the following would do:

Riak Links
1
2
3
4
5
6
7
8
9
10
11
12
var aNewPost = {id: 18,
                date: new Date(),
                title: 'a second blog post',
                body: 'blog post about Riak part 2'};

// Save the second post, with a link to the first post
db.save('posts', aNewPost.id, aNewPost,
  { links: [ {bucket: 'posts', 'key': 17 } ]});

db.walk('posts', '18', [{bucket:'posts',tag:'_'}]);
// db.walk, traverses object 18's links, 
// which happens to be post 17, and returns them.

Conclusions

While the above assessment is pretty rosey, Riak shouldn’t be the only database in your toolbox. Redis’ pub/sub and sorted sets are unmatched in Riak. If you’re running map/reduce over large datasets, you’re likely better off using Hadoop. Conversely if your already well-versed in SQL, and your data is relational, using Postgresql is probably a better fit. Despite those caveats being able to easily scale your database, and save JavaScript objects, is a pretty compelling reason to use Riak with Node.js

Further Riak and Node.js Reading

Adding Real-Time to Rails With Socket.IO, Node.js and Backbone.js (With Demo)

UPDATE: see my new article on adding real-time to your Rails application.

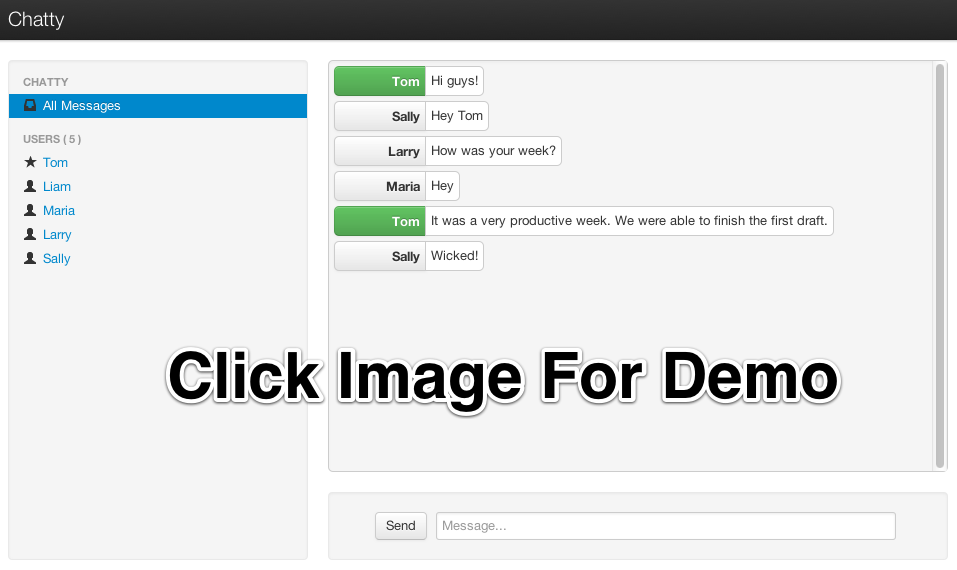
Despite the recent distaste for Rails, I still think its a nice framework for developing websites (e.g. devise & active record). However, if you want real-time communication Socket.IO and Node.js seem to be the best options. If you already have an existing Rails application porting the entire application to Node.js is likely not on option. Fortunately, it is relatively easy to use Rails to serve your client-side Socket.IO web application, while Node.js and Socket.IO are used for real-time communication. The primary goal of this article is to show one method of integrating a real-time application, that is slightly more complex than a todo app, with Rails. Thus, I created Chatty, a simple chat room web application that allows a user to see all the messages in the chat room, or filter the messages by user. Twitter’s Bootstrap was used for the CSS and modal dialogue.

Code on Github

Rather than explain the code step-by-step, I’ll provide a high level overview of:

  • File organization
  • JavaScript Templates and EJS
  • Application Archicture and Publish/Subscribe
  • Module Architecture
  • Deploying to Heroku

File Organization

The entire client-side Backbone.js application is within app/assets/javascripts. Using a JavaScript manifest file (backboneApp.js) all of the application’s JavaScript files are specified.

Manifest file (app/assets/javasripts/bacboneApp.js)
1
2
3
4
5
6
//= require jquery
//= require bootstrap
//= require underscore
//= require backbone
//= require socket.io
//= require app

The Backbone application is within the app folder, which also has a manifest file. The manifest files describe all the JavaScript files that comprise the application. Within the application’s html file only a single line of code is needed to include the manifest file: =javascript_include_tag "backboneApp" (haml for templating). The actual organization of the files is as follows:

app/assets
1
2
3
4
5
6
7
8
9
10
11
12
13
14
15
16
17
18
javascripts
├── app
│   ├── index.js
│   ├── launch.js.coffee
│   ├── main.js.coffee
│   ├── modules
│   │   ├── index.js
│   │   ├── loadModule.js.coffee
│   │   ├── messageModule.js.coffee
│   │   ├── socketModule.js.coffee
│   │   └── userModule.js.coffee
│   └── templates
│       ├── message.jst.ejs
│       ├── modal.jst.ejs
│       └── user.jst.ejs
├── application.js
├── backboneApp.js
└── backbone_app.js.coffee

main.js.coffee is where the app object is defined, while `launch.js.coffee` is called last, after all the files have loaded, to launch the Backbone.js application. Each module, which might contain models, collections and views, are stored within the modules folder. The module structure was modelled after Backbone Boilerplate.

JavaScript Templates and EJS

To take full advantage of the asset pipeline it seems as if Sam Stephenson’s excellent EJS Gem was the most hassle free approach for JavaScript templates. Both the ‘ejs’ and ‘jst’ extensions are require for the EJS gem to compile the template, and include it within a JavaScript file. Access to the template is done with the global JST object.

Application Architecture - Publish/Subscribe

Before creating the application I decided to forgo the use of asynchronous module definition (AMD) and use a publish/subscribe (pub/sub) architecture (see Addy Osmani’s description of Pub/Sub). Specifically, each module is wrapped in an immediately-invoked function expression, and within each module functions can attach themselves to events (subscribe), or trigger events (publish). Using this approach the applcation’s only global variable is app which contains a copy of Backbone’s event object.

To reiterate none of the modules call methods from other modules, all communication occurs with pub/sub. This design pattern was a pleasure to use; adding new functionality often required simply subscribing to events! I found that my code stayed much cleaner than previous attemps with Backbone.js.

Module Architecture

The application is comprised of two types of modules, those that contain Backbone.js code (messageModule, userModule), and one that contains the Socket.IO code (socketModule). If either the messageModule, or the userModule, require content from Socket.IO they subscribe to events that the socketModule trigger. Likewise, Socket.IO messages sent to the server are the result of the socketModule suscribing to events triggered by the messageModule and userModule.

Below is an example module that contains skeleton code for an additional Backbone.js module. The ExampleModule class is used to glue all the Backbone.js objects together. In this case their is only one, the ExampleView, in Chatty’s MessageModule there are two distinct views instantiated within its MessageModule object.

Example Module
1
2
3
4
5
6
7
8
9
10
11
12
13
14
15
16
17
18
19
20
21
22
23
24
25
26
27
28
29
30
31
32
33
34
35
ExampleModel = Backbone.Model.extend()

ExampleCollection = Backbone.Collection.extend
  model: ExampleModel

# View for a single model
ExampleView = Backbone.View.extend
  render: () ->
    @$el.html app.template 'example', @model.toJSON()
    @$el

# View for a collection of models
ExamplesView = Backbone.View.extend
  initialize: () ->
    @collection = new ExampleCollection()
    @collection.on 'add', @addExample, @
    @eventHandlers()

  eventHandlers: () ->
    # Subscribe to the app-wide event 'new-example'. When 
    # the event is called, the call-back function is provided
    # with an example model, which is then added to the collection.
    app.events.on 'new-example', (example) =>
      @collection.add example

  addExample: (example) ->
    exampleView = new ExampleView
      model: example
    @$el.append exampleView.render()

class ExampleModule
  constructor: () ->
    @examplesView = new ExamplesView()

new ExampleView()

Deploying Node.js and Rails App to Heroku

Deploying the Node.js server

Heroku requires the following code to create the Socket.IO server and listen for connections (note that Heroku doesn’t support websockets):

Socket.IO server
1
2
3
4
5
6
7
8
9
10
11
12
13
14
var app = require('http').createServer();
var io = require('socket.io');

io = io.listen(app);
io.configure(function(){
  io.set("transports", ["xhr-polling"]);
  io.set("polling duration", 10);
  io.set("close timeout", 10);
  io.set("log level", 1);
})

io.sockets.on('connection', function (socket) {}
var port = process.env.PORT || 5001;
app.listen(port);

Unfortunately, Heroku’s documentation only contains fragments of the above code. The above code, along with deploying instructions, is posted across several pages: getting started with Node.js on Heroku/Cedar and using Socket.IO with Node.js on Heroku. The `close timeout` option was added since the default 25 seconds made the chat app seem buggy (a user would log out but other users would seem them logged in for 25 seconds).

Deploying the Rails app

Deploying a Rails application is relatively well documented, but I thought I’d provide a few additional tips.

The URL for the production and development Socket.IO server differ. To accommodate this the Backbone.js app makes an Ajax request to the Rails app and gets the URL of the Socket.IO server along with a unique id for the current user. The Rails app can serve a different Socket.IO URL depending on whether it is currently in production or development.

The other thing that might be new for nacent Rail’s developers is the inclusion of the response.headers code in the show method, this tells the browser to cache the Backbone.js app for 25,300 seconds.

Controller associated with Backbone.js App
1
2
3
4
5
6
7
8
9
10
11
12
13
14
15
16
17
18
19
class BackboneAppController < ApplicationController
  layout 'backboneApp'
  respond_to :html, :json
  def show
    response.headers['Cache-Control'] = 'public, max-age=25300' if Rails.env.production?
  end

  def user_info
    respond_with({
        'uuid' => UUIDTools::UUID.random_create.to_s,
        'socketURL' => self.get_socket_url
    })
  end

  protected
  def get_socket_url
    Rails.env.production? ? "http://chatty-server.herokuapp.com/" : "http://0.0.0.0:5001"
  end
end

In order for Heroku to manage the asset pipeline your application must be deployed to Heroku Cedar’s stack. Unfortunately the Cedar stack doesn’t include Varnish caching, requiring you to enable caching via memcache and the dalli gem. I found that deploying a new version would not necessarily clear the cache and and I had to do it manually (connect to console: heroku run console):

Clearing the cache
1
2
dc = Dalli::Client.new('localhost:11211')
dc.flush_all

Final Thoughts

Relying entirely on pub/sub to communicate between modules worked really well in this application, but I wonder if it would scale to a larger application? I’d also be curious to know how other developers are combining Backbone apps with Rails, I suspect there are a number of ways to do it.

Code on Github

Integrating Backbone Boilerplate With Rails 3

Despite making several small Backbone.js apps in the past year, Backbone.js had never really clicked with me. I wasn’t crazy about having to spend time thinking about file and folder organizing for JavaScript and template files. I was also unsure how all the pieces would fit together. Thanks to Tim Branyen’s Backbone Boilerplate those issues have been significantly reduced. According to Backbone Boilerplate’s documentation: “This boilerplate is the product of much research and frustration. Existing boilerplates freely modify Backbone core, lack a build process, and are very prescriptive; this boilerplate changes that.”

While I was excited to use Backbone Boilerplate, it wasn’t immediately clear how I’d integrate it with Rails 3. After several hours of tinkering I came up with an approach that places the build product of your backbone app in the lib/assets folder. This approach means that the application can be integrated into the assets pipeline and easily deployed to heroku.

Code on Github

Creating the Rails App

Getting Started
1
2
3
4
5
6
7
8
9
10
11
12
13
14
// create a new rails app
rails new rails-bb
cd rails-bb/lib

//remove the index file
rm -r public/index.html

cd lib
git clone https://github.com/tbranyen/backbone-boilerplate.git
cd backbone-boilerplate

//switch to the amd branch
git checkout amd
rm -rf .git

Changing Build Settings

In biolerplate’s config.js file modify the following to:

line 49 - lib/backbone-boilerplate/build/config.js
1
2
3
4
5
6
7
8
9
10
11
12
13
concat: {
  "dist/debug/require.js": [
    "assets/js/libs/almond.js",
    "dist/debug/templates.js",
    "dist/debug/require.js"
  ],

  "../assets/javascripts/require-app.js": [
    "assets/js/libs/almond.js",
    "dist/debug/templates.js",
    "dist/debug/require.js"
  ]
},
line 67 - lib/backbone-boilerplate/build/config.js
1
2
3
4
5
6
7
8
9
mincss: {
  "dist/release/index.css": [
    "assets/css/style.css"
  ],

  "../assets/stylesheets/index.css": [
    "assets/css/style.css"
  ]
},

Creating a Rails Layout and Controller

To build the app, go to lib/backbone-boilerplate and run node build default mincss. The build script will create lib/assets/javascripts/require-app.js that includes both the backbone-boilerplate application and the template files. In next step create a rails layout file app/views/layouts/bbapp.html.erb with the following content:

bbapp.html.erb
1
2
3
4
5
6
7
8
9
10
11
12
13
14
15
16
17
18
19
20
21
<!DOCTYPE html>
<html>
<head>
  <meta charset="utf-8">
  <meta http-equiv="X-UA-Compatible" content="IE=edge,chrome=1">
  <meta name="viewport" content="width=device-width,initial-scale=1">

  <title>RailsBb</title>
  <%= stylesheet_link_tag    "application", :media => "all" %>
  <%= csrf_meta_tags %>
</head>
<body>

  <!-- Main container -->
  <div role="main" id="main"></div>

  <!-- Application source -->
  <%= javascript_include_tag "bbapp", "data-main" => "app/index" %>

</body>
</html>

To plug the backbone app into the asset pipeline create assets/javascript/bbapp.js with the following contents:

bbapp.js
1
2
//
//= require require-app

Now we need to let rails know that it needs to compile bbapp.js for production. To do this open config/environments/production.rb and after config.assets.compile = false add:

config\environments\production.rb
1
config.assets.precompile += %w( bbapp.js )

To test that this works, we’ll create a controller that has a single action that uses the bbapp.html.erb layout. From the root of the rails-bb application:

1
rails generate controller BackBoneBoilerplate app

Go to the controller that was just created: back_bone_boilerplate_controller.rb and specify the layout:

app/controllers/back_bone_boilerplate_controller.rb
1
2
3
4
5
6
7
class BackBoneBoilerplateController < ApplicationController

  layout 'bbapp'

  def app
  end
end

Final Steps

In config/routes.rb a root route is added to point to the controller actiona associated with the backbone app: root :to => 'back_bone_boilerplate#app' At this point we’re nearly done. Unfortunately to get the backbone.png to load I changed the src attribute, of the img tag on line 2, in lib/backbone-boilerplate/templates/example.html to src="/assets/backbone.png" and then from lib/backbone-boilerplate:

1
2
3
4
5
6
7
cp assets/img/backbone.png ../app/assets/images/backbone.png

\\recompile
node build default mincss

cd ..
rails server

If all went well, when you go to http://0.0.0.0:3000 you should see:

While the above approach works, it was laborious and requires rebuilding the application with each change. Watching for changes with node build watch would certainly help. I think the advantage of this approach is that in development you can debug the JavaScript, while in production the javascript is minified and goes through the asset pipeline like any other JavaScript file in a Rails app.